1. Oil Spill

Here is a great lesson idea to use when studying oil spills and environmental issues pertaining to the ocean or water systems. Students will learn and better understand the negative effects that oil spills have on the environment and the animals. This lesson is set up as three different stations or mini-lessons. The first lesson involves the teacher reading from the text Oil Spill! by Melvin Berger. This book tells the story of a significant oil spill off the coast of Alaska in 1989. The Exxon Valdez spilled millions of gallons of oil into the Pacific Ocean. The book continues on talking about the impact of the oil spill on the fish and animals and human efforts to clean the oil from the water. The second lesson from this plan has the students observing and recording what they see about three different feathers. One feather is dry, the second is dipped in water, and the third is coated in vegetable oil. The third lesson involves the children trying to clean feathers that have been exposed to oil. With warm, soapy water, the children will gently clean the feathers, as if they were real birds, and experience how difficult the oil is to clean off of animals. From there, the teacher can have a conversation with the children about the effects that oil spills have on the animals and the environment.
2. Does it Dissolve?
In this lesson, students will experiment with various materials to see whether or not it dissolves in water. Using materials such as flour, salt, sugar, pepper, and a Life Saver, students will place a spoonful of each material into a clear plastic cup of water. After stirring each material for a few seconds, students will observe what happens to the materials and decide if it dissolves in water or does not dissolve. As an introduction activity and concluding activity, have students make predictions and record their predictions on a graph. After the experiment is over, refer back to the chart to see if their predictions were correct.
Lesson plan idea from:
Ritz, W.C. (2007). A head start on science encouraging a sense
of wonder. Arlington, VA: National Science Teachers Association. 3. My Favorite Rock

This lesson is a great activity to use to introduce the
skill of observation and comparing and contrasting natural objects based of
physical features. Students will go on a
rock hunt outside. If rocks are in
abundance then students can find their own rocks, but if there are not small
rocks around, then the teacher can scatter rocks in a small location for
children to choose from. Students will
select one rock to keep and bring back to the classroom. Each student will observe his or her own rock
and pick out specific physical features.
From there, students can compare the rock to other rocks to find
similarities and differences. To
conclude the activity, all of the students will place his or her rock into a
bucket and the teacher will mix them up.
See the students can find their rock again based on the characteristics
that they observed.
Lesson plan idea from:
Ritz, W.C. (2007). A head start on science encouraging a sense
of wonder. Arlington, VA: National Science Teachers Association.4. Mystery Samples

In this lesson, students will use observations to make
inferences about what is in each of their canisters. The teacher will prepare
one film canister for each student. In
the canisters, put in items that make distinct sounds. Examples would be water, a paper clip, rice,
a marble, or a penny. If you make pairs
of each canister so that two children will have the same item, they will be
able to compare their observations towards the end of the lesson (It would be
helpful to number each of the canisters and create an answer key with the pairs
of canisters from the beginning).
Students will make observations about their item in the canister based
on mass (They can use a balance scale and measure an empty canister to figure
out the mass of their item), the sound it makes in the canister, whether it is
magnetic, etc. From their observations,
students can make an inference about the contents of their canister. After this lesson, have a conversation with
the students about how scientists use observations from their data to make
inferences. For example, Archaeologists
make observations of artifacts to infer how people lived love ago. Before letting children open their canisters
(if you even want them to open their canisters), have the students pair up
according to matching canisters based on their observations. Encourage students to discuss what properties
their objects might have that cannot be observed such as shape, color,
temperature, etc. Follow up with a
discussion
Lesson plan idea from:
Ansberry, K. R., & Morgan, E. (2005). Picture-perfect science
lessons using children's books to guide inquiry, 3-6. Arlington, VA:
National Science Teachers Association.5. Sea Turtle Survival Game

In this lesson, students will learn about the dwindling
population of sea turtles. Two great
books to go along with this lesson are Turtle
Bay by Saviour Pirotta and Turtle,
Turtle, Watch Out! by April Pulley Sayre.
After talking about the sea turtle’s migration patterns and the journey
they partake in laying eggs, this activity will demonstrate to students how the
turtle population is helped or harmed from natural and human factors. Students will make fortune tellers to predict
their fate as a sea turtle. The students
will include A, B, C, and D on the second flap of their fortune teller. The inside of the fortune teller will include
the following phrases:
-
Raccoons dig up turtle eggs. SIT DOWN
-
Turtle eats plastic bag floating in ocean. SIT DOWN
-
Shark catches turtle. SIT DOWN
-
Shrimp net catches turtle. SIT DOWN
-
Volunteers clean trash off beach to help
turtles. STAY STANDING
-
Person puts up sign to keep cars off beach. STAY STANDING
-
Moonlight attracts turtle to the ocean. STAY STANDING
-
Child protects nest with wire mesh. STAY STANDING
Any other fortunes can be included, but each fortune teller
should have four that result in sitting down and four that result in
standing.
All of the students start the game by standing up. The teacher rolls a die on a 2x2 grid with
the letters A, B, C, and D on it. Before
the die is rolled, the class can chant, “Turtle, Turtle, WATCH OUT!”
The children will open and close their fortune tellers according
to the number on the die. Then they will
choose the letter that the die lands on.
Each student will open their letter and read their fortune. Depending on what their fortune says, they
will either continue standing, or sit down.
After each round, the teacher will graph the number of turtles who are
still alive. After five rounds, or when
everyone is sitting down, discuss with the children how many turtles survived each
round and what kind of dangers the turtles encountered. After discussing the results of the game, ask
the students if they think human actions help or harm sea turtles and if they
think humans should interfere with nature by helping the sea turtles?
Lesson plan idea from:
Ansberry, K. R., & Morgan, E. (2005). Picture-perfect science
lessons using children's books to guide inquiry, 3-6. Arlington, VA:
National Science Teachers Association.6. The Changing Moon

In this lesson, students will keep a moon journal and draw
what the moon looks like each night for one month. Ask the students to draw and note the moon’s
color, its shape, its size, if clouds were a factor, etc. After a month of observing the moon, ask the students
if they notice any patterns. From there,
have a lesson about the phases of the moon and what causes the light and change
of phases. Demonstrate the phases of the
moon with a white foam ball on a pencil and a lamp. Students will hold the foam ball on a pencil
with their arm extended out in front.
Begin with the foam ball held directly between the student and the lamp. The foam ball represents the moon and the
lamp represents the light. Their eyes
represent what part of moon can be seen from earth. Allow children to explore and create the
different phases of the moon by rotating their body around while holding the
foam ball. Explain to them that they are the Earth and the moon is orbiting
around the Earth. Discuss with the
students what causes the light and the shadows.
Lesson plan idea from:
Ansberry, K. R., & Morgan, E. (2005). Picture-perfect science
lessons using children's books to guide inquiry, 3-6. Arlington, VA:
National Science Teachers Association.
7.
Erosion

This is a three station lesson that includes experiments for
students to explore the effects of water and wind erosion on rocks and
soil.
The first experiment includes filling a large plastic jar
halfway with large and small pieces of gravel, sand, and soil. Add water to fill the rest of the jar. Be sure the lid is on tight and have the
students take turns shaking the jar for one minute. Set the jar aside and complete the other
experiments. Return after the other
experiments are complete to observe what happened to each of the
materials. Ask the students to imagine
the materials flowing down a river.
Which type of material would be carried the longest distance and which
type would settle to the bottom of the river?
The second station will explore how water causes changes in
rocks. Divide a cup of rocks into two
equal piles. Put one pile of rocks into
a plastic jar and fill the jar halfway with water. Close the lid tightly and have the students
take turns shaking the jar for a total of ten minutes. Hold a strainer over another container and
pour the mixture through the strainer.
Have the students compare the rocks that were shaken to the other pile
of rocks. Also have the students examine
the water that was drained from the rock mixture. Pour the water through a coffee filter into a
pan and allow the students to observe what they see on the coffee filter. Discuss with the students the effects the
water had on the rocks and where in the environment this might occur naturally.
In the third station, the students will determine how wind
can cause changes in rocks. NOTE: FOR
THIS STATION, ALL STUDENTS MUST WEAR SAFETY GOGGLES COVERING THEIR EYES. Inside of a shallow shoe box, pour a cup of
sand into one end of the box. One
student at a time will place his or her hand inside the other end of the box
with their palm facing the sand. A
partner will begin by blowing gently on the sand, blowing the sand in the
direction of the partner’s hand. He or
she will gradually blow harder until the sand hits the other student’s hand. Have the students feel the sand that was
blown to the other end of the box by rubbing it between their fingers. Do the same to the sand left in the original
pile and have the students compare their textures.
Lesson plan idea from:
Ansberry, K. R., & Morgan, E. (2005). Picture-perfect science
lessons using children's books to guide inquiry, 3-6. Arlington, VA:
National Science Teachers Association.
8.
Friction
This is an exciting science lesson on friction. Students will conduct an experiment to
determine what types of surfaces create the most friction by pulling a bin
across various surface types. The
different surfaces include four different boards covered in sandpaper, fabric,
wax paper, and the last one is left uncovered.
The boards should be a few feet long and have a start line on one side
of the board and a finish line on the other.
Using two identical containers attached with a string, the students will
place one container on the starting line of one of the boards. The second bin should be dangling off the
edge of the board. The students will add
weights to the hanging bin until the other bin crosses the finish line on the
board. By comparing the amount of weight
needed to pull the bin across each of the surface types, students will notice a
difference in the amount of friction for each surface.
This lesson plan idea is from a second grade teacher, Mrs.
Thompson, from Fairview Elementary. Find
her full lesson plan at: http://www.lessonplanspage.com/sciencelessonfriction-htm/
9.
U.S. Space Missions
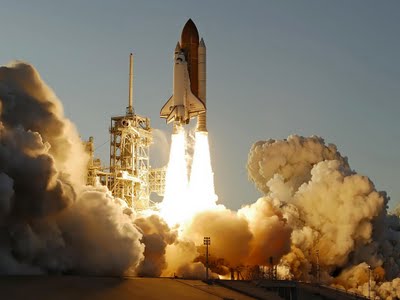
Going along with a unit on space, this lesson is a fun way
to introduce the progress that the U.S. has made with our space program over
the past years. The teacher begins by
discussing the first two missions into space and how with each mission, we were
able to learn more and more about space.
The teacher uses pictures and news clippings of each big mission into
space to teach students the importance of each mission. The pictures demonstrate the growth and development
of new technology over the years including our new and growing space
station. After the students learn about
the history of our space missions and the importance of each of them, students
will also learn a chant to help remember the missions. The chant is a fun way to incorporate music
into the science lesson, but it is also catchy enough that the students will be
hooked!
Space Mission Chant:
There’s Mercury, Gemini,
Apollo and then
The shuttles that
Come back again!
Apollo and then
The shuttles that
Come back again!
This great lesson idea is from Sarah
Lortie. Find her full lesson plan at: http://www.lessonplanspage.com/sciencemusicnamestagesofusspaceprogram23-htm/
10.
Solids, Liquids, and
Gases
In this fun, kinesthetic, and engaging activity, students
will become molecules and discover the differences between solids, liquids, and
gases. In a large open area, students
will spread out and move wherever they wish.
The teacher will explain to them that together they make up a gas. Next the students will be confined to a
smaller area. They should have enough room
to move slowly, but they might be bumping into each other by now. Here, they are representing a liquid. Last, have the students confined to a space
where each student is shoulder to shoulder and unable to move side to
side. This represents a solid form. This activity is great for visual and kinesthetic
learners to interact and play out the roles of each phase.
This lesson plan idea is from Robyn Tainton. Find her full lesson plan at: http://www.lessonplanspage.com/sciencegasliquidsolidstudentenactment38-htm/
No comments:
Post a Comment